目录
Xray八合一共存脚本(v2ray-agent)具有(VLESS+TCP+TLS/VLESS+TCP+XTLS/VLESS+WS+TLS/VMess+TCP+TLS/VMess+WS+TLS/Trojan/Trojan-Go WS)等多种安装模式,还能自动生成伪装博客,且支持多内核安装。什么是Xray?
特点
- 支持Xray-core[XTLS]、v2ray-core
- 支持VLESS/Trojan前置[VLESS XTLS -> Trojan XTLS]、[Trojan XTLS -> VLESS XTLS]
- 支持不同核心之间的配置文件互相读取
- 支持 VLESS/VMess/trojan 协议
- 支持Debian、Ubuntu、Centos系统,支持主流的cpu架构。
- 支持任意组合安装、支持多用户管理、支持DNS流媒体解锁、支持添加多端口、支持任意门解锁Netflix
- 支持卸载后保留tls证书
- 支持IPv6
- 支持WARP分流、IPv6分流
- 支持BT下载管理、日志管理、域名黑名单管理、核心管理、伪装站点管理
- 支持自定义证书安装
支持组合方式
- VLESS+TCP+TLS
- VLESS+TCP+xtls-rprx-direct
- VLESS+gRPC+TLS【支持CDN、IPv6、延迟低】
- VLESS+WS+TLS【支持CDN、IPv6】
- Trojan+TCP+TLS
- Trojan+TCP+xtls-rprx-direct
- Trojan+gRPC+TLS【支持CDN、IPv6、延迟低】
- VMess+WS+TLS【支持CDN、IPv6】
准备
1. 在搭建之前你需要一台国外服务器! 建议选择Debain 9 及以上,或者Ubuntu 16 及以上、又或者CentOS 7 及以上。为什么需要一台服务器请参考这里。如何选择优质的服务器请参考什么是VPS?应该如何选择?
2. 服务器购买之后 需要通过SSH客户端连接服务器,以便操作你购买的远程服务器 Windows系统请参考 Bitvise连接Linux服务器教程,mac用户请参考 Mac电脑连接Linux教程
3.购买一个便宜的域名,在后台设置DNS,将域名指向你的VPS服务器IP。购买合适的域名请参考适合国人的域名注册商推荐。 我推荐直接购买namesilo
域名购买可以参考上文介绍的域名网站,购买成功后在设置DNS时,可以设置将根域名指向服务器IP(解析域名请参考解析namesilo域名教程),也可以设置二级域名。
比如域名是abc.com,那么可以随意设置 abc.com 或者 www.abc.com 又或者 ab.abc.com,以上三种形式都可以。
4.如果你觉得搭建流程太麻烦,可以考虑Justmysocks的代理服务,可以免去搭建流程,速度和性价比也不错。just-my-socks购买和使用教程
执行Xray服务器一键搭建脚本
(1)安装 wget 命令
yum -y install wget   #CentOS/Fedora/RHEL
apt-get install wget    #Debian/Ubuntu
(2)执行一键安装Xray服务器脚本
wget -P /root -N --no-check-certificate "https://raw.githubusercontent.com/mack-a/v2ray-agent/master/install.sh" && chmod 700 /root/install.sh && /root/install.sh
(3)选择1.安装
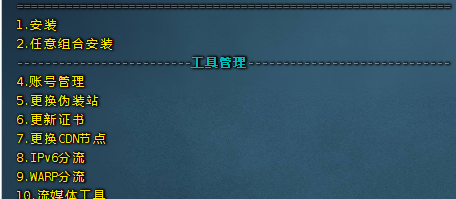
(4)选择Xray-core 内核

(5)输入前面准备好的域名

(6)安装证书来源 默认回车即可

(7)路径默认回车即可

(8)默认回车

(9)出现一下链接说明搭建成功

(10)记得打开 443端口
iptables -I INPUT -p tcp --dport 443 -j ACCEPT
配置客户端
支持Xray协议的客户端非常多!具体请看Xray客户端大全
我建议直接使用v2rayN。配置非常简单:
1.复制搭建服务器成功后获得的快速导入链接,如图

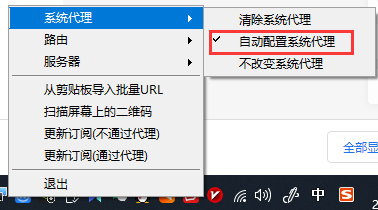
2.打开v2rayN 客户端,选择从剪贴板导入

导入成功

3.开启V2rayN 即可实现科学上网
更多使用教程请参考:
BBR加速
其他一件脚本
除了SSR以外,还有其它一些常用的代理工具,比如Shadowsocks/V2ray/Trojan/WireGuard等,可以作为SSR的备用选择。
具体搭建流程可以参考:


I was very pleased to uncover this great site. I need to to thank you for ones time for this fantastic read!! I definitely appreciated every bit of it and I have you bookmarked to look at new information on your blog.
I was very pleased to uncover this great site. I need to to thank you for ones time for this fantastic read!! I definitely appreciated every bit of it and I have you bookmarked to look at new information on your blog.
I was very pleased to uncover this great site. I need to to thank you for ones time for this fantastic read!! I definitely appreciated every bit of it and I have you bookmarked to look at new information on your blog.
d5zrvg